A Quick Guide for Prep Centers Using InventoryLab
New to InventoryLab as a prep center? If so, we’ve got you covered with this quick guide to get you started! Among its many benefits, InventoryLab’s streamlined listing process is a standout favorite. With easy batch and shipment creation, listing your products can be a one-stop shop. However, if you create shipments outside of InventoryLab, we’ll walk you through alternative options depending on your client’s preferences. With these tips, we know you’ll become an InventoryLab expert!
Accessing InventoryLab
To begin using InventoryLab, the initial step is to acquire employee access. This requires the main account holder to add your prep center email address as a sub-account. Once added, your prep center will have its own login credentials and can access the required pages within InventoryLab. Additionally, access to your client’s Seller Central account will also be important. The main account holder can follow the steps provided in the articles below to grant access to both your InventoryLab and Seller Central accounts.
Creating an Employee Account in InventoryLab
User Permissions in Seller Central
Understanding the Batch and Shipment Creation Process
When it comes to a batch, it may be helpful to think of it as a shopping basket or cart you use at the store. You gather the products you want and place them in your cart, occasionally reconsidering choices or adding/deducting the number of items. Once your cart has everything you need, you proceed to checkout your items.
This analogy is a simple breakdown to describe how InventoryLab works:
— Your Batch (or cart) is where you enter all the items you want to sell on Amazon
— Just like a shopping cart, a Batch can have items added, removed, or replaced until you are ready to checkout (create shipments) and pay.
— Checking out translates to sending your item listings to Amazon and creating FBA Shipments
— When your shopping cart items (Batch) gets checked out, it is no longer active. This is similar to if you forgot something at the store. If you needed another item, you would come back in and grab a new cart (or start a new batch).
Understanding this process can help you set your expectations before using InventoryLab and position you for success!
Starting Batches
Once your employee status is confirmed, it’s time to start listing! If your prep center is responsible for batch creation, this will take place on the List & Prep page of InventoryLab. When setting up a new batch, you’ll have the opportunity to tailor your preferences to your liking. These options include selecting the batch name, ship-from address, packing type, fulfillment channel, workflow type, and labeling preferences. You can also import your buy list from Scoutify or use a .CSV file you created, but we’ll cover that in more detail next!
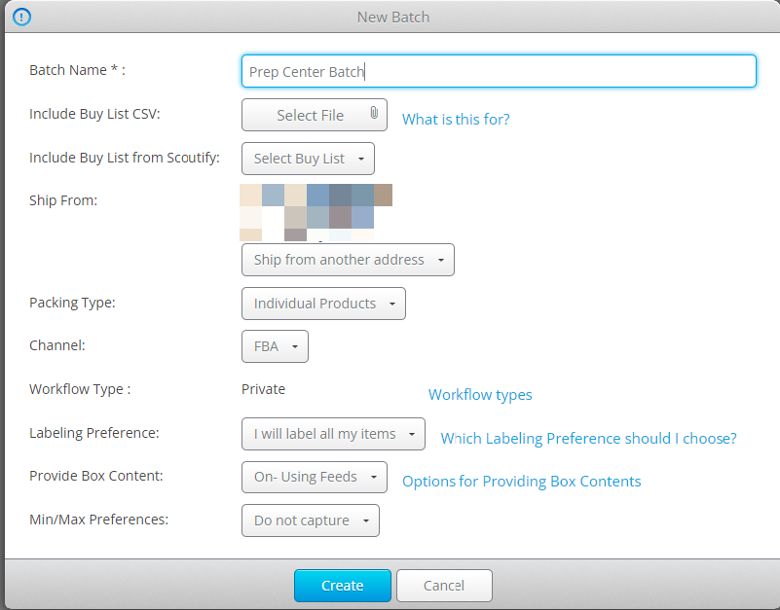
For step-by-step guidance on creating your batch, refer to the resource below.
Starting a Batch – Private Workflow
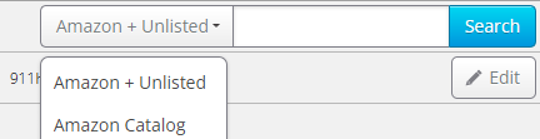
After you have created your batch, you can then begin adding your items. InventoryLab offers various search options when looking up items in Amazon’s catalog. This includes scanning a UPC or entering an item’s ASIN, ISBN, title, UPC, keyword, or FNSKU of a previous MSKU. You also have the ability to search and add items directly from the account’s Unlisted Inventory by selecting Amazon + Unlisted in the dropdown menu next to the search bar.
Once you’ve found the product, you can add the buy cost, supplier, purchase date, expiration dates, list price, and other important listing details.
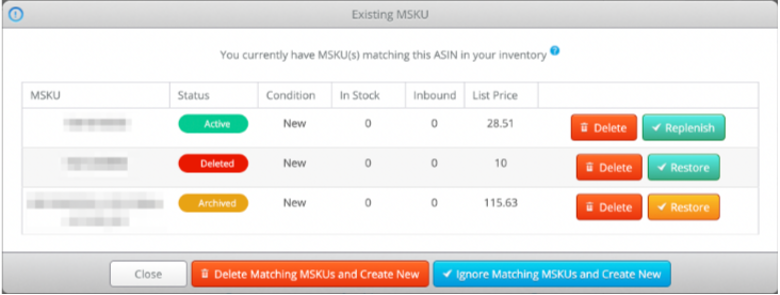
Managing replenishments is also straightforward – as a prompt will appear on the screen with different options for moving forward if the item searched is already in your inventory.
If your prep center handles shipment completion as well, it’s time to review your batch, submit your feeds, and sync your product details. Depending on your client’s preferences, there are different approaches you can take based on your box content settings. Check out the article below for quick steps on listing and completing your SPD shipments in InventoryLab.
Quick Start – Listing and Completing a Private FBA Batch in InventoryLab
Buy Lists
If you’re looking for a speedy way to list your items, Buy Lists are the way to go! When uploading a buy list, you can import a .CSV file or a buy list directly from InventoryLab’s Scoutify app. When importing your buy list, the item’s ASIN, List Price, and Quantity are required, but you will also have the option to include the following:
ASIN (required)
List Price (required)
Quantity (required)
Title
Cost/Unit
Purchased Date
Supplier
Condition
MSKU
Sales Tax
Discount
Expiration Date
MFN Shipping Template
Condition Notes
Tax Code
Min Price
Max Price
More on importing a buy list using a .CSV file can be found here: Importing Your Buy List
Uploading a buy list directly from our Scoutify app is one of its many great features. While using the app, your client can create a list of items that they have purchased to later input into InventoryLab in bulk. As an employee, you will also have access to the Scoutify app with your same login credentials. Check out these steps for detailed instructions on this process: Scoutify 2: Buy List – Exporting a Buy List
Streamlining Box Content Assignments
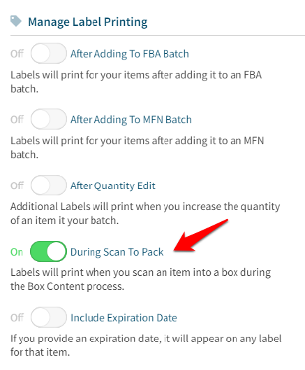
To streamline the process of sorting items into boxes and providing box-level content to Amazon, InventoryLab offers the option to scan to pack your items. You have the option to scan either the FNSKU on each item or the manufacturer barcode to assign it to a specific box.
Additionally, you can further optimize your workflow by enabling the “During Scan to Pack” option within your Print Settings. With this setting enabled, your FNSKU labels will automatically print as you scan items, eliminating the need for manual printing and minimizing interruptions during the packing process
For a comprehensive overview of this process, you can refer to the resources below.
Box Content – Assign/Remove Items in Bulk
Inbound Shipping Page
The inbound shipping page is a central hub for efficiently managing your shipment information. Within this page, you can view essential details to stay on top of your shipments. This includes your Batch Name, Shipment Created Date, Shipment Status, Shipment ID, Destination, Shipment Cost, Box Costs, and Other Costs.
You can also easily generate packing lists, and reference tracking IDs or PRO Numbers. If you need to reprint your box labels, shipping labels, and 2D Barcode Labels, this can also be done on this page.
Need to make adjustments to your shipments? Here you can tweak the Shipment Created Date, adjust the Box Cost, or modify Other Costs for speedy corrections.
Completing your Shipments
When using InventoryLab, we suggest finishing your shipments directly within the platform. This eliminates the need to convert your shipments to “Send to Amazon,” reducing the potential for errors and ensuring a smoother workflow.
To guide you through the process, we’ve created detailed, step-by-step instructions that walk you through each stage of completing your shipments within InventoryLab for both SPD and LTL shipments.
SPD:
Box Content Using Feeds – Completing SPD Shipments
Box Content Using 2D Barcodes – Completing SPD Shipments
Completing SPD Shipments with Box Content Off
LTL:
Box Content Using Feeds – Completing LTL Shipments
Box Content Using 2D Barcodes – Completing LTL Shipments
Completing LTL Shipments with Box Content Off
If you complete shipments in Seller Central, then you can follow the steps in the article below. With this route, make sure to watch out for error messages, as this will prevent your information from being transmitted correctly! You also cannot make any changes to your shipment once it’s been converted to Send to Amazon.
Customer Coaching!
If you’re still seeking ways to maximize your use of InventoryLab, we highly recommend exploring our Live Customer Coaching classes! These sessions are conducted by an InventoryLab Customer Champion in a live, small group format, allowing for interactive Q&A sessions.
Visit the link below to view the available topics, session times, and detailed information about each class. To reserve your spot, click on the topic that interests you to access the sign-up page. We look forward to seeing you there!
Try InventoryLab Today
30 Day Free Trial
Save time and money by streamlining your Amazon business. Source, List, Ship, and Analyze all in one place.
Get Started
Aaliyah
Do you have a list of US Prep Centers that are using InventoryLab already?